Front Suspension
Note that many bolts are 16mm so make sure you have the right spanner sizes.
see below if a spring breaks then it could be caused by corrosion. Peugeot have been known to replace for free - this is urgent+++ and do replace the top mount ball bearing and rubber mount at the same time.
see below if the front suspension creaks or has a light knock it could be the bush breaking away in the rubber top mount and needs doing
see below if you want to change the track control arm.
see here if the front wheel bearing needs replacing.
see here if the front suspension squeaks loudly (variable according to water on road) as it could be the roll bar rubbers (annoying but not urgent).
see here if you want to fit Citroen Spring Catchers to prevent a broken spring puncturing the tyre.
see here if you want to change the lower ball-joint.
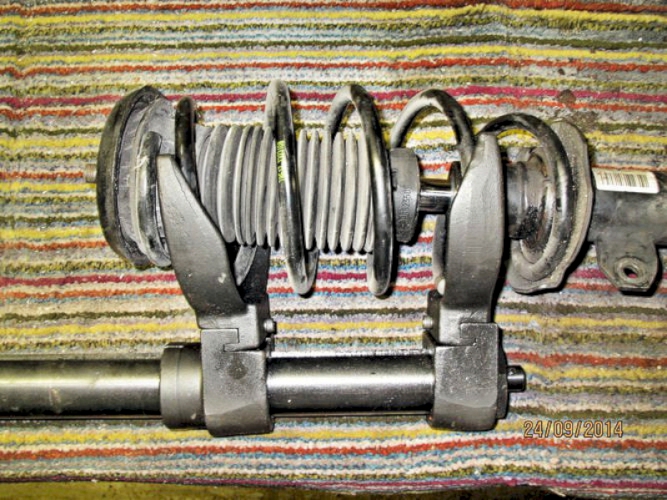
Replacing Front Struts

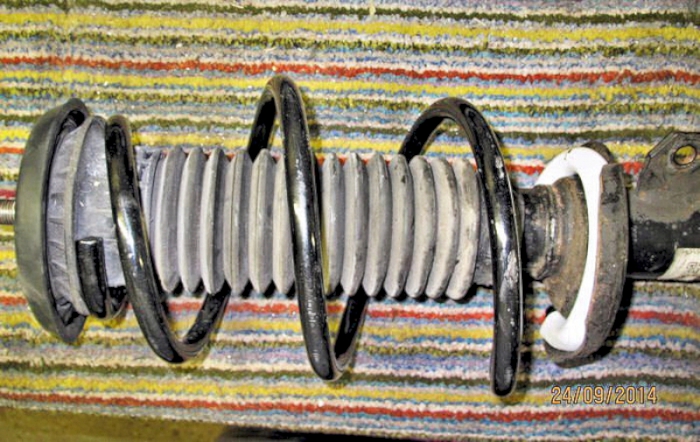
the strut itself - has a plastic shield which can be assembled wrong way. The skirt should hang down over the top of the strut where the piston enters the damper.
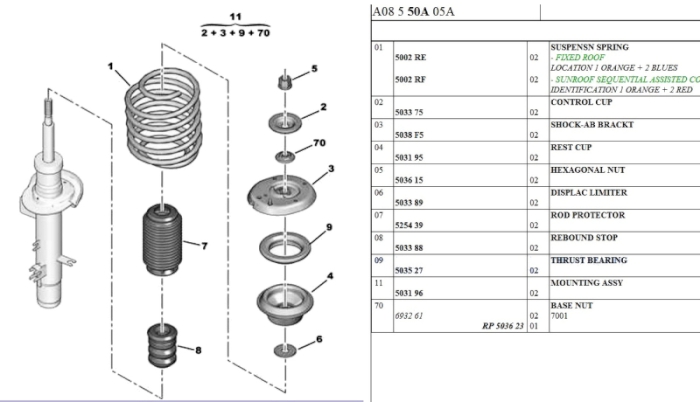
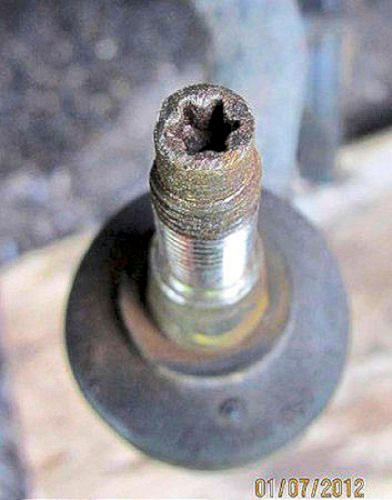
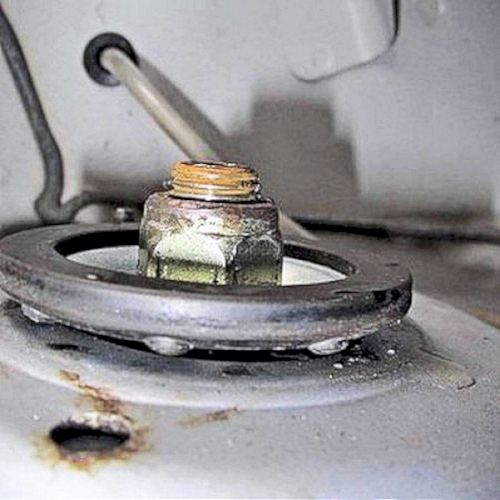
this shows the parts of the strut assembly - it is essential that all the parts are assembled in the right order and the top nut (item 70) done up tight preferably with an impact gun. A correctly assembled strut only has two threads above the top nut (see below).
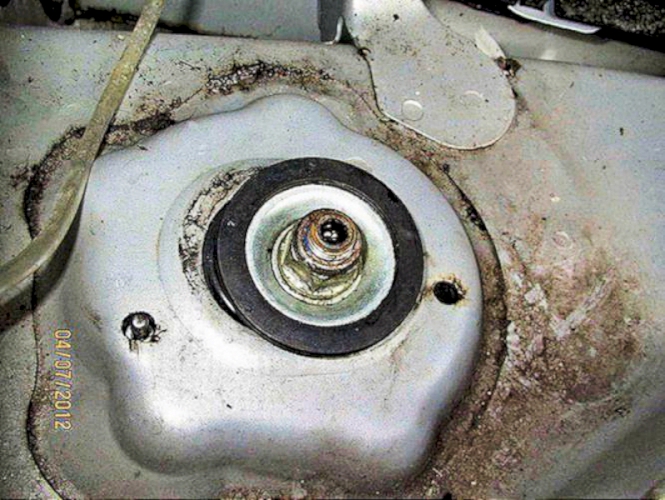
The rebound washer (2) should NOT turn with the steering as the top of the strut shaft should be held from turning by the spacer bonded into the rubber mount (item 3)
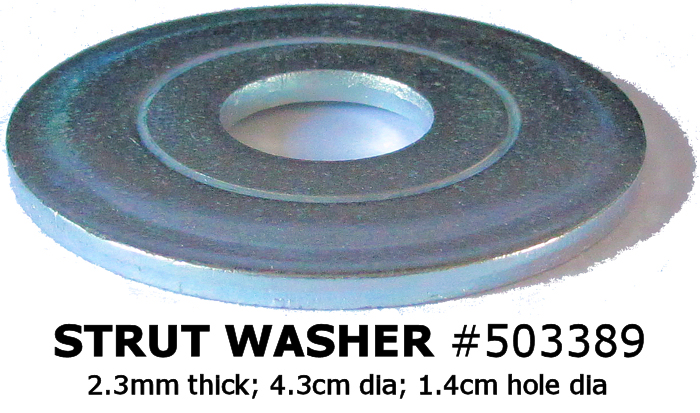
this thick washer (item 6 - "displac limiter") is very important - if left out, the suspension will collapse. When assembling, put the rest cup (item 4) on first, followed by this washer which must rest on the shoulder on the strut.

this is the whole strut assembly - it is easier to remove the whole strut rather then attempt to dismantle parts on the car.
The conventional method of separating the strut from the hub on the car is difficult due to the lack of space to use spring compressors - also this can damage the upper bearing and/or rubber mount but most replace these anyway.
The official Peugeot method requires more dismantling and ends up with you handling the heavy strut and disc assembly - which still have to be separated using some force. Note that this can take some time as corrosion makes it difficult to get apart as Peugeot didn't use any assembly lubricant.

It was very difficult to get the strut out of my wife's car because the parts had corroded together even though I did it "by the book".
This meant removing the strut and hub as a single unit and then separating them.

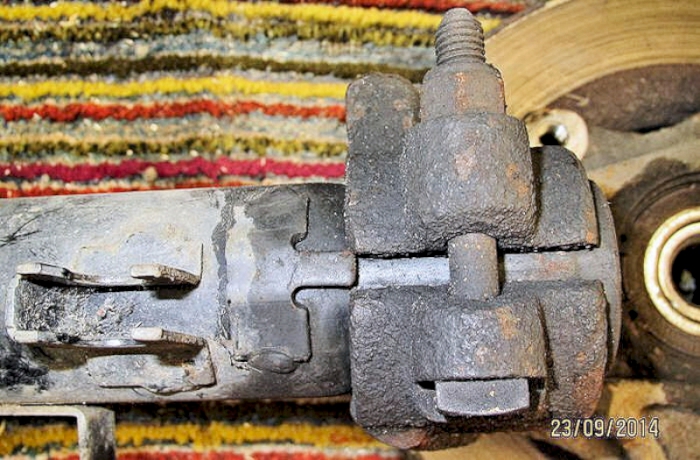
Note there is a locating tang (conveniently out of sight when the strut is on the car) which should locate well down into the clamp on the hub assembly.
also that the special bolt used has a square head to stop it turning when the nut is being tightened
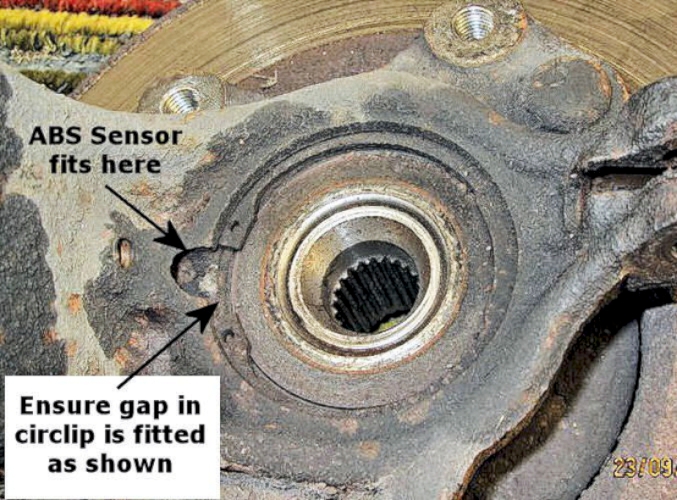
if replacing the wheel bearing note there should be a magnetic reluctance ring on one end which activates the ABS sensor - it is all too easy to assemble it the wrong way around - and also some cheaper bearings don't have the reluctance ring.
double check the circlip isn't obstructing the clear view the ABS sensor has of the reluctance ring.

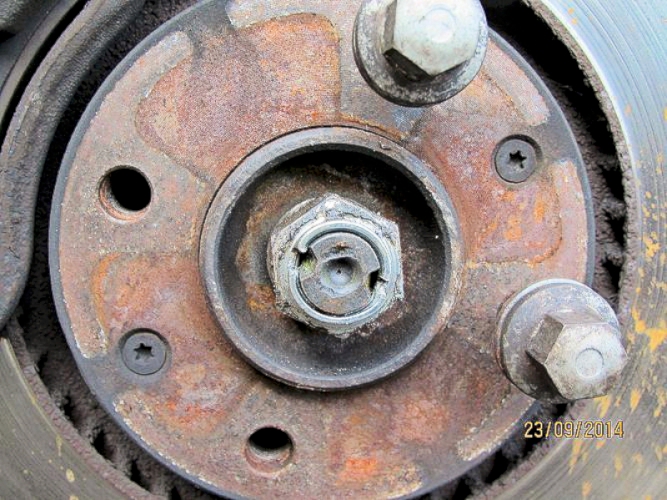
First - remove the hub nut - it should need unstaking.
As it is done up extremely tightly, I used a 30mm ¾" socket on mine helped by a 1 metre extension pipe. The hub was locked from rotating by a long crowbar whilst the hub was supported by a bottle jack.
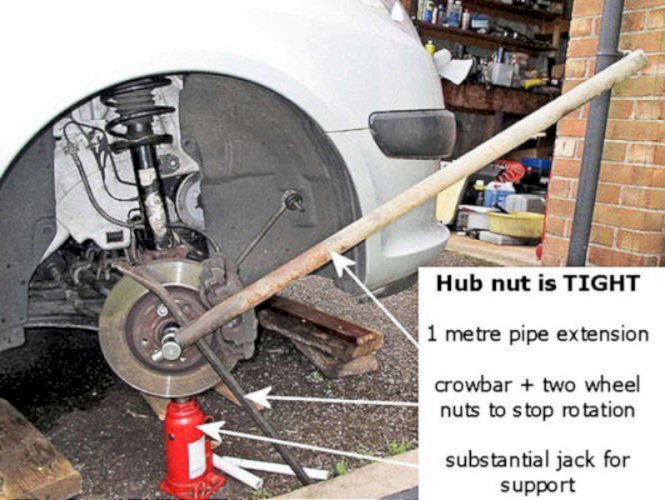
On replacing (as in the pictures), Peugeot say use a new nut. Once fully tightened this should be staked - to do this it needs hitting quite hard with a blunt but strong chisel!
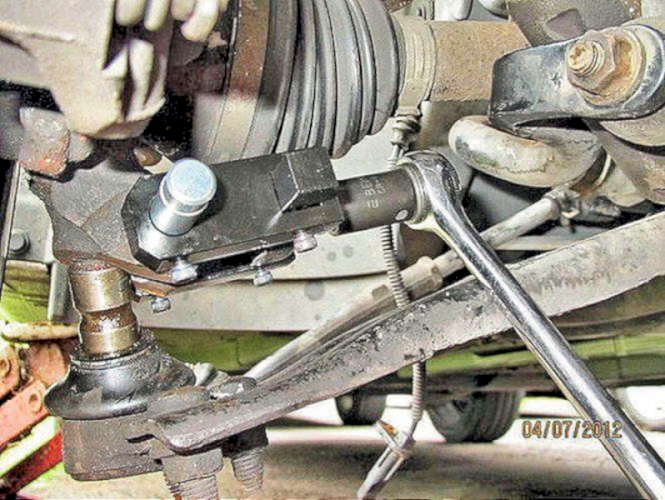
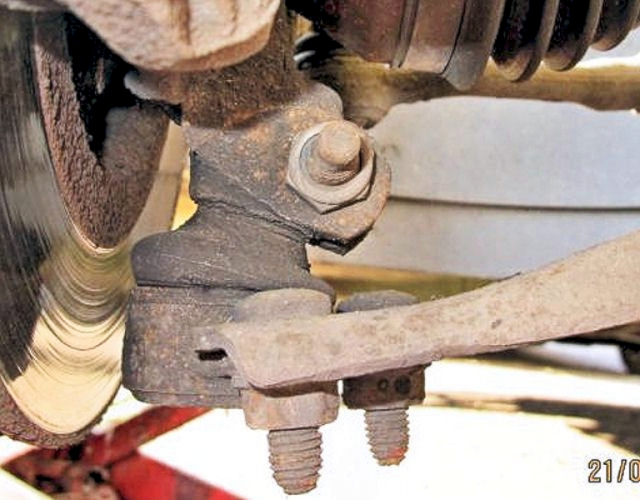
The lower balljoint was well corroded in (why don't Peugeot use any assembly compound?) so I bought a spreader tool shown here.
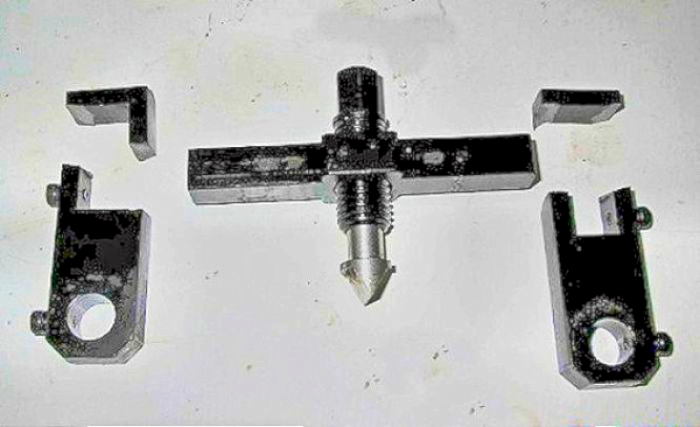
Sadly it only spread one joint before it broke apart when I used it on the other side. The arms were cast metal rather than made from a solid billet as I would have expected at this high-stress point.

The larger of these two for a ½" socket is far simpler and more effective; rotate to open up the joint.
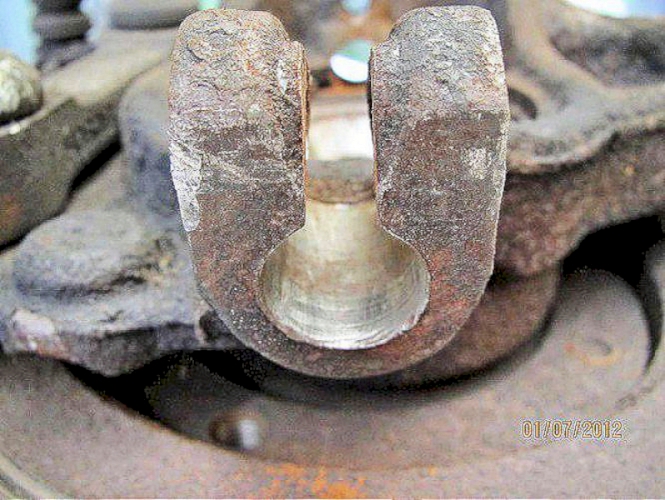
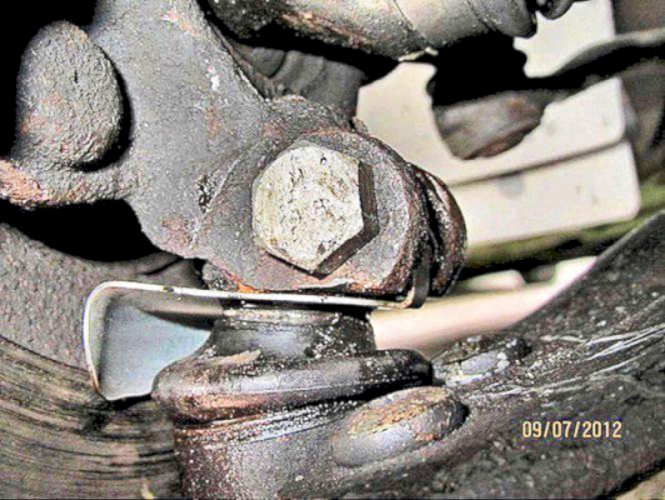
After removing the clamping nut and bolt, the lower balljoint clamps were well corroded in place and took considerable force from a very long "pickle fork" to separate.
Not shown here - but you will need to disconnect the upper mount before the strut assembly can be lowered.
Remove both wiper arms (you will probably need a small puller for this). With the bonnet open, lift out the two-piece plastic grilles over the plenum chamber; they are only held by the rubber seals.
Remove the rebound disc from the top of the strut and lower the strut. You may need an impact gun and spanner to remove the nut as there is no way of holding the shaft other than a rather small torx socket which may have been OK for assembly but isn't big enough once the parts start to corrode together!
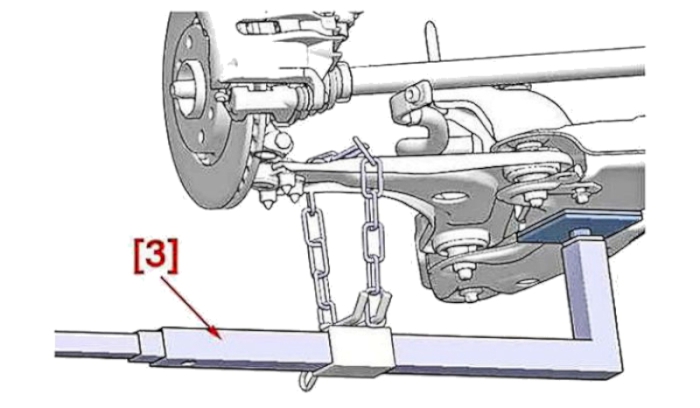
Once separated it will be necessary to pull down the lower wishbone to make space to drop the spring strut hub assembly out - Peugeot recommend this tool.

Bergen make a 1.2m Wishbone Bottom Arm Lever Control Removal Tool which is adjustable and fits our suspension layout well

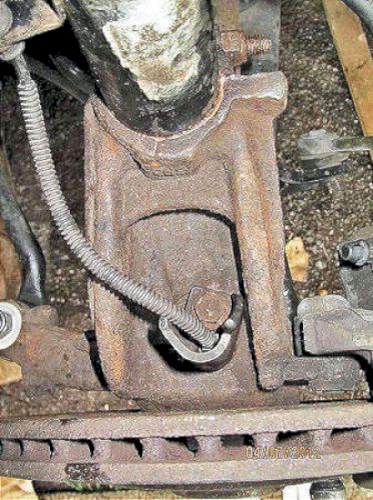
The corrosion is evident on the main strut clamp
the long picklefork I had to use to remove the joint damaged the balljoint protector so I had to buy new ones - oddly, one protector was mysteriously absent.
this is how a new one should fit, with the locating tang located in the split in the clamp.
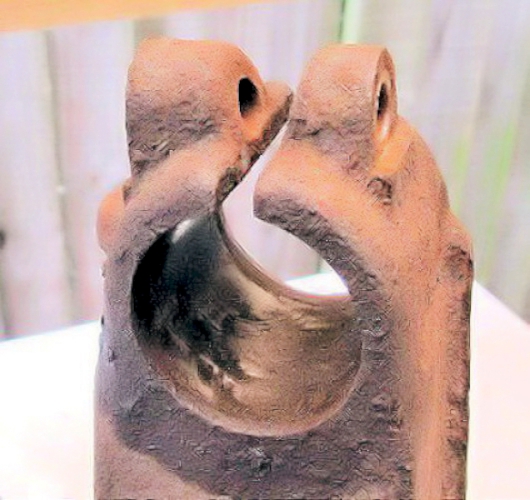
the strut and the hub were also difficult to separate because of the corrosion.

the dryness and surface rust on the driveshaft, track rod end and lower balljoint can be seen.
The track-rod end looked easy enough - except that the end threads were so badly corroded the nut would NOT come off and had to be ground off. There was no possibility of the T30 Torx bit holding against the force required!
Use a wire brush followed by a thread file (or better, an M10 x 1.25 pitch die chaser) to clean up the threads
The ABS sensor is a tight fit in the hole after removing the securing bolt - lever up carefully using two screwdrivers!

Like everything else, surface corrosion made life unnecessarily difficult.
When all parts are released:
lever the bottom arm down and lift out the strut and hub assembly.
At this stage the hub can pivot outward and pull the driveshaft out of the differential housing, releasing some oil. Poke the driveshaft back in quickly and support the hub!
If this happens to you, it is best to replace ALL the oil as you can't tell how much came out and there isn't a level plug. Change the oil anyway - my wife's car didn't have much oil in it when I drained it.
If yours is a 1587cc or 1360cc petrol engine see this page to replace the gearbox oil
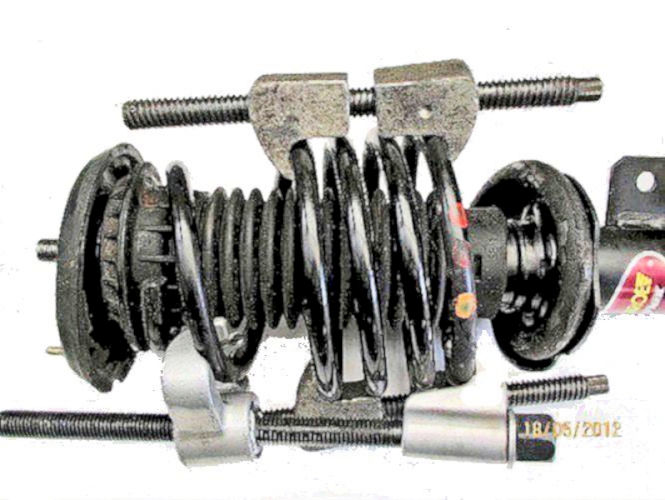
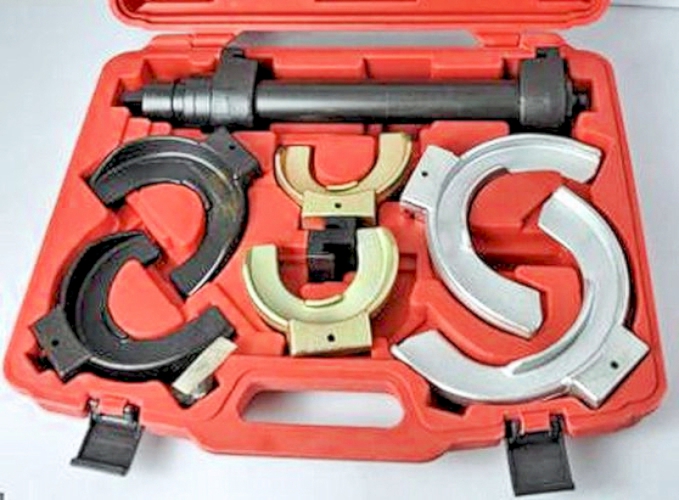
Compress the spring - three compressors shown as the first two didn't compress enough of the spring. Since then I have used the safer compressor below.
WARNING: be very careful if using this simple type of compressor as they can easily slip due to the angle of the spring. My old compressors that I had used for years were simply not safe on these springs.

remove the nut from the top of the strut - not so easy to do as it requires use of a spanner at the same time holding the centre rod stationary with a Torx bit. I was able to wind mine off with an impact gun and 22mm impact socket.
this design is intrinsically safer (though still needs care!). Many versions are available on ebay and elsewhere.
assembled like this, it is much harder for the compressed coil to escape.
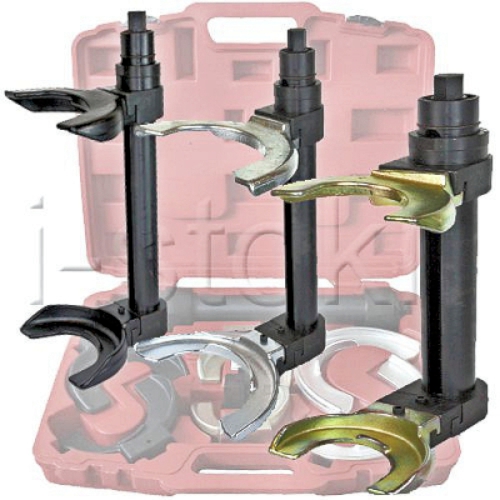
Note that this picture shows three combinations - however only one can be used at a time
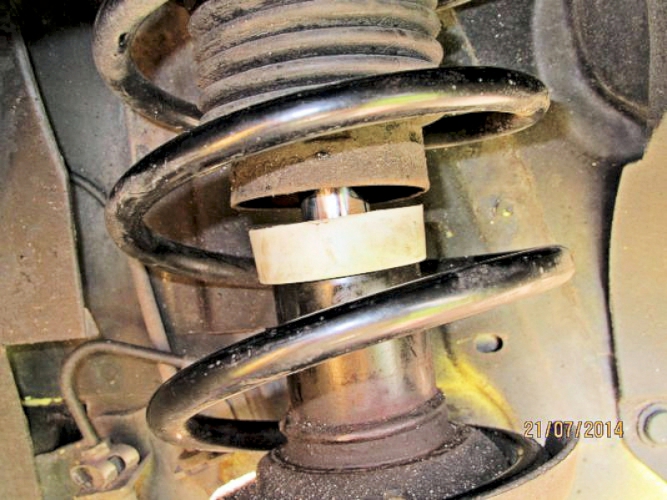
Compressing the spring and changing the top mount with its ball bearing inserted is carried out in the conventional manner.
On replacement, ensure the end of the spring abuts the end stop on the lower mount of the strut. The top mount doesn't have a "correct" orientation and can be assembled in any position relative to the spring. However to make life easier on reassembly, ensure the top mount and hub are approximately in the correct relative orientation.
showing a new top mount assembled with the nut tightened down
showing the strut reassembled and pressure released from the spring compressor.
and the drivers side strut mounted back in the car with the top rebound washer and nut fitted
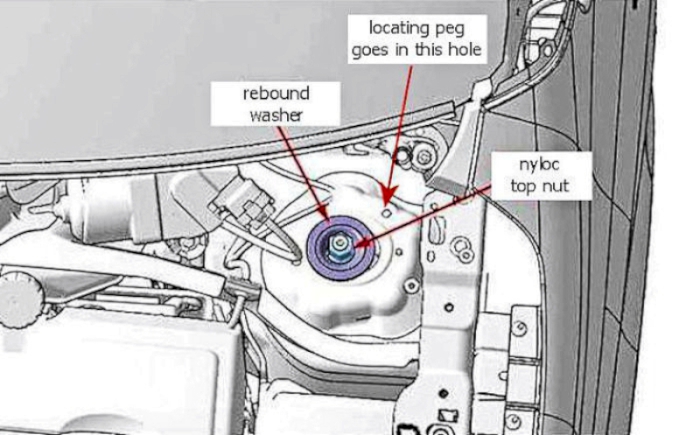
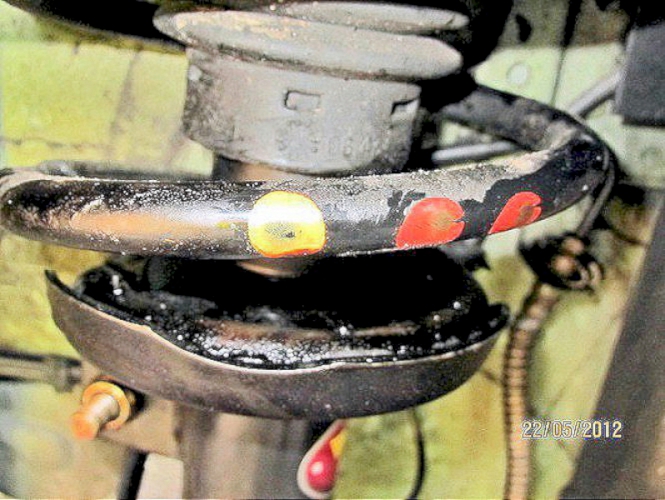
The passenger side top mount: - this shows the locating pegs mounted nearer the outside of the car (see drawing and at position A on the right-hand picture). This pushes the top mounts towards the centre of the car, giving negative camber and better turn-in.
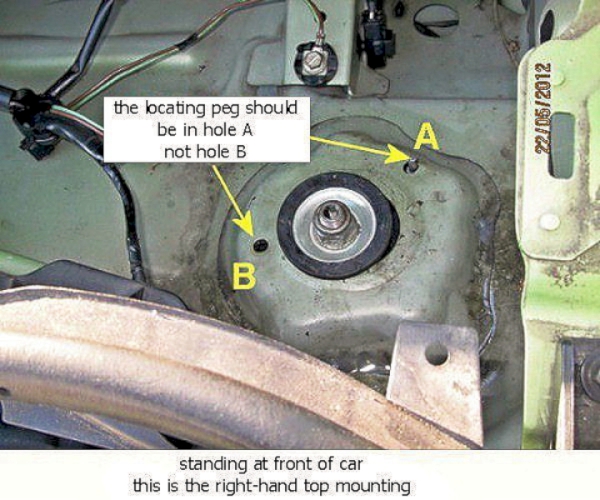
Confusion had been caused by the mounts on my wife's 1007 which has the locating pegs in the holes nearer the centre of the car. The incorrect assembly probably occurred when the front springs were replaced by a local garage after one broke.
If you look at the pictures above the locating pin should go into hole A so the top of the mount is pushed towards the centre of the car in the oval hole. This appears to be the correct position.
If the pin is in hole B then the top mount is pushed a significant distance towards the outside of the car. This alters the camber and theoretically the toe-in however to be fair we never noticed any change in handling when one of ours was assembled wrongly.
Certainly the turn-in on these cars (especially considering their height) is very good with the locating pin in hole A - and above all, the top mount seems to fit more naturally into the aperture. However the fact that they CAN be put in the wrong way is a definite black mark against Peugeot especially as it is very difficult to find ANY evidence as to which locating hole should be used.
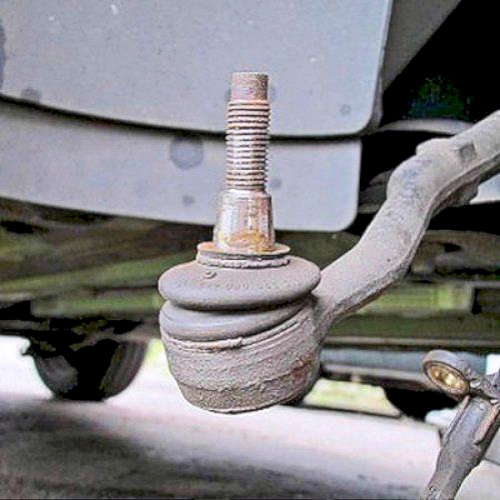
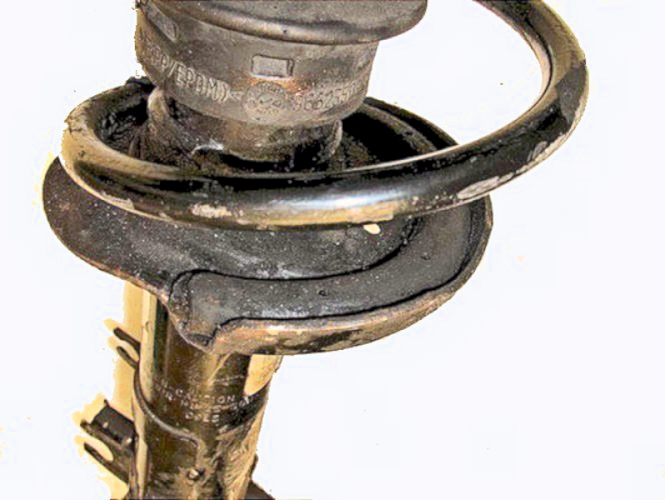
the rebound rubber is slightly clear (about 2mm) of the inner wing; it doesn't turn with the steering
Note: there should be about 2 turns clear above the nut when fully tightened down, no more
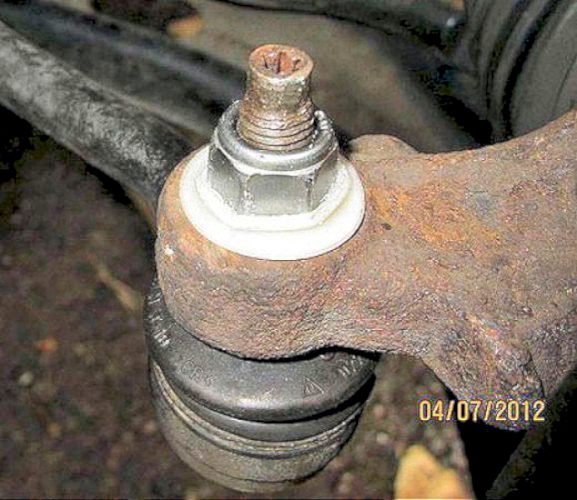
the new track rod end nut comes with its own special plastic washer
Les McArthur discovered that when replacing the outer track rod ends, 1007's from 2008 onwards have the bore of the track rod larger than pre 08. Peugeot don't keep it in stock and motor factors only keep the pre 08 version with the later ones being a special order and nearly 3 times the price as well.
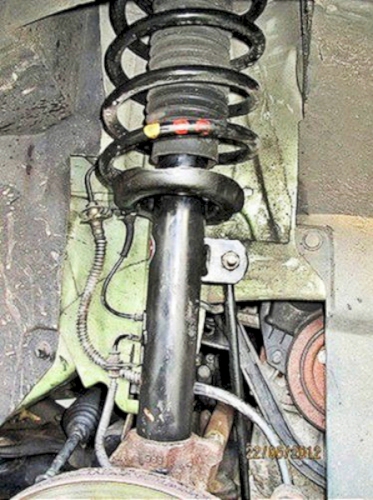
Drivers side and passenger side reassembled with two new Monroe struts, rubber top mounts and ball thrust bearings.
the lower coil of the springs have been waxoyled to reduce the likelihood of premature failure due to salt corrosion.
see this page for details of the effects of salt corrosion
Fitting Suplex springs
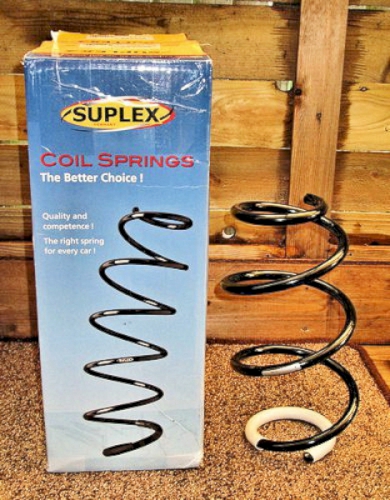
Suplex make the Spring Catchers so I fitted a pair of Suplex springs to the yellow 1.4 Petrol Dolce.
I cannot say whether they improve the ride, as other parts were fitted at the same time, but the car certainly appears to run smoother

the Suplex springs I received (SUP 24145) are shorter and with fewer turns (but thicker wire) than the originals.
Aftermarket spring that was fitted has 4 "free" coils - excluding the end turns. Total = 5¼ turns of wire diameter = 0.441" (11.2mm)
New Suplex spring 24145 has 2 "free" coils - excluding the end turns. Total = 3¼ turns of wire diameter = 0.497" (12.6mm)
Some confusion as a new pair of Suplex springs 24146 for the 1.6 Petrol with sunroof revealed 5 "free" coils - excluding the end turns. Total = 6¼ turns of wire diameter = 0.490" (12.2mm)

the "short" Suplex springs need a good compressor to grip the turns as the springs are stronger and have greater angle than the originals.
and the Suplex springs fitted to the strut.
note that although the springs are shorter, the ride height does not change once they are mounted on, and constrained, by the strut.
Track Control Arms
I've not done this so no photos - info from Francois Winstein
The easiest way to remove track control arms is to
- undo the hub nut
- then the 2 control arm nuts
- then withdraw the 2 bolts
- and the ball joint pinch bolt
- then the droplink bottom nut
- and pull the track control arm out the subframe
- finally - hammer it down to release the balljoint from the hub.
Having gained more experience of the front suspension layout of the 1007 I find they are not easy to work on especially once they start to corrode and possibly as a result the local garage (not Peugeot agents) managed to get both struts on my wife's car mounted incorrectly.
When the Peugeot main dealers changed the front springs on my 1007, the estimate was around two hours but it took them four which rather suggests the dealers took a hammering. I understand the reason now!
As well as mounting in the wrong locating hole (above), here are a few errors I found in cars having had new front springs recently fitted by garages.
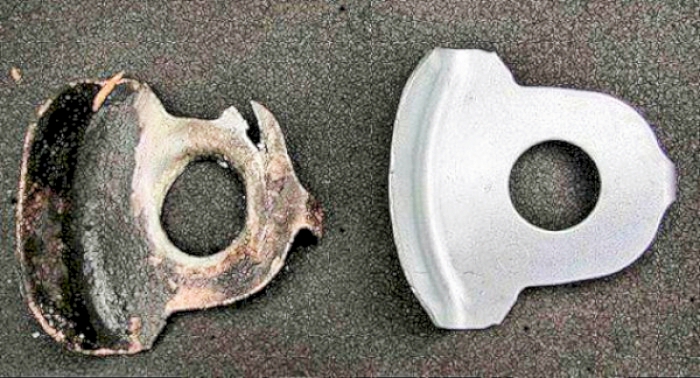
commonly missing is the balljoint protector - see above for how they should look. This is a thin metal pressing intended to protect the rubber seal over the balljoint and are often damaged when prising the lower balljoint out of the hub assembly and not replaced.
always replace the balljoint protector
although done up tight, this poorly staked reused wheel nut could have come off
always replace the wheel nut by new on these cars
it is vital for this tang to be pushed down into the hub as far as possible
although done up tight, this could have moved slightly and rotated out of alignment
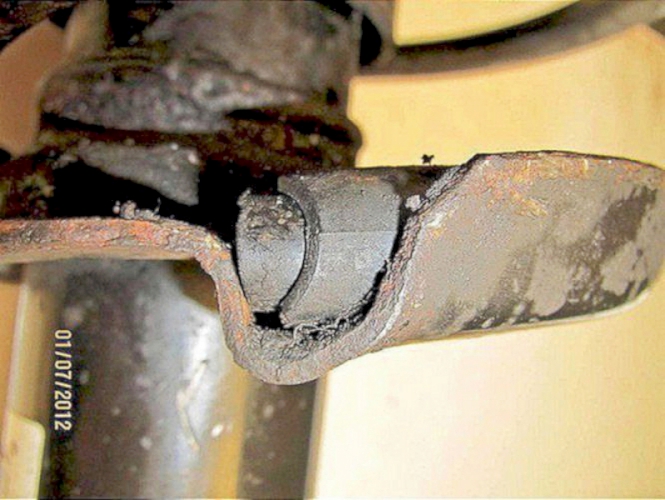
this collar is upside down - when properly fitted to the strut, it acts as a lower mounting point for the dust protector.
if not fitted properly, will allow dust and dirt in to the damper piston rod and damage the seals

On another car, after the main dealers had changed the springs, I found that the bush had pulled out of the top rubber mount and had set about destroying the surrounding rubber
always replace the top rubber mount when repairing the suspension

and another punched through - not sure if the critical thick washer part 6 is present or not.
at least three threads above top nut, should be two - again suggesting the thick washer part 6 may be missing.
always ensure the thick washer is installed correctly.

(and another - photo courtesy Mike Lawrence)
This has been assembled wrongly; not sure if the washer etc has punched through the rubber top mount or if it has just been screwed on above, instead of below, the mount.
The gap is excessive and there appears to be five threads above the nut whilst a correctly assembled strut only has two threads above the top nut.