Manual Clutch
These seem to be very reliable with few faults reported, however more problems are popping up now as the cars age
Clutches seem to last between 40,000 and 80,000 miles; failure is usually indicated by slipping. This is caused either by the clutch plate becoming worn out (expensive) or the hydraulics leaking.
Clutch judder on take-off
If otherwise in good condition, clutch judder on take-off can be improved by slowly pulling away in second (on the flat), once or twice. This rubs off any irregularities on the friction plate and improves smoothness for a while.
Slipping clutch
Apart from wear, another cause of clutch slip could be oil on the clutch plate from a leaking gearbox seal.
This might be caused by a worn input shaft bearing (mainly found on diesels at around 70,000 miles; petrols seem to last) and/or failure of the gearbox oil seal

The bearing is internal and needs a gearbox strip down to replace it. The seal is external and includes the release bearing guide. It is often changed at the same time as the clutch. Check for lateral play on the input shaft before committing to opening the box up. Worn bearings usually sound a bit noisy and allow the shaft to spin off centre to the seal causing a leak. Or the seal has just failed.
Replacing the manual clutch slave cylinder: information and pictures provided by Paul Swift
Paul says his car is an 1.4 Hdi sport manual in Salamanca Orange (metallic gold) and it is an easy job compared to some. Took about 30 minutes and £24 for new part from Eurocarparts.
Notes:
- It is a shared reservoir for clutch/brake
- Fixing bolts are 13mm and bleed nipple 11mm
- For my diesel the new part number is 137540020 at £23.70 from Eurocarparts. I used their website to confirm part for our car by entering reg number
- Bleeding before remounting is not totally necessary but the bleed nipple is not very accessible once slave cylinder is fitted
With front of car up on ramps, remove the undertray (diesels only; not normally fitted to petrol cars) and open bonnet
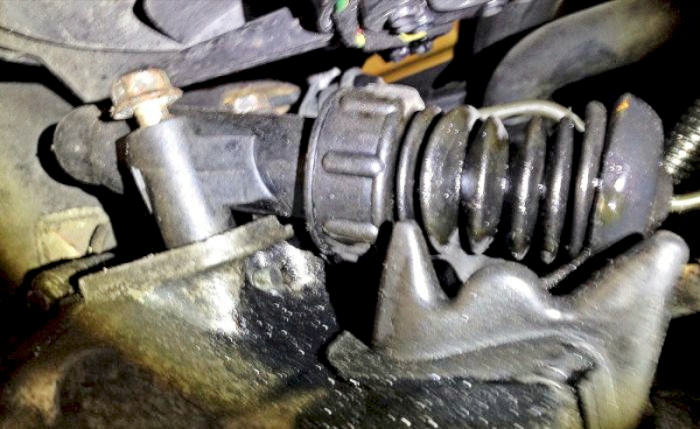
The view up behind the front valance shows the leaking slave cylinder with one mounting bolt undone a couple of turns.
remove the two mounting bolts to release the slave cylinder, watching out for escaped clutch fluid collected in the concertina rubber cover. The cylinder should now be hanging on the fluid hose.
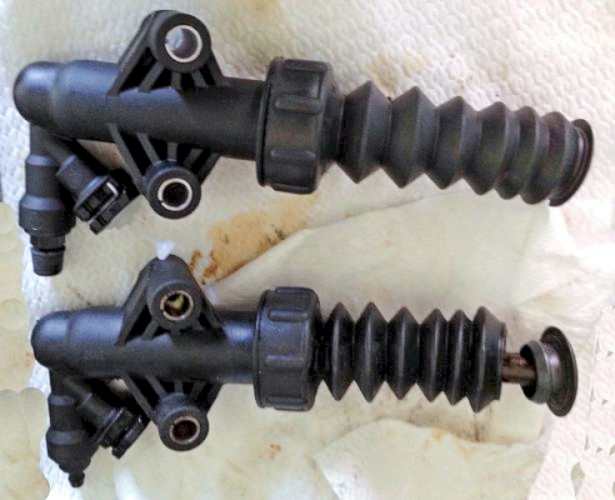
old (lower) and new (upper) slave cylinders

Unpack the new cylinder and remove the blanking plug
The fluid hose is held in place by a metal clip which can be eased off with a small flat point screwdriver (there was a new clip with the new cylinder) and an interlock mechanism on the plastic push-fit end on the hose. Orientate correctly and squeeze the sides to release. Note that fluid will escape so promptly block with finger.
Discard old cylinder, and grab new one. Remove metal clip then insert hose into hole that had blanking plug and squeeze sides until it slots home. NOTE: there should be a rubber seal on the end of the hose; it may get stuck in the old cylinder. Push on metal clip to lock hose into place
Top up brake fluid and replace cap. Open bleed nipple on new cylinder after removing rubber cover if it has one. Move clutch pedal up and down in coordination with opening/ closing bleed nipple until fluid comes through then tighten bleed nipple and replace rubber cap.
Now is the time to clean up around the area
Offer up new cylinder to mounting position ensuring piston rod end engages with cup on actuator arm, insert and tighten the two mounting bolts
(if fitted) clean and refit under tray
Move off the ramps onto level surface and top up brake fluid to correct level