Timing Chain Guides
Replacing the timing chain guides became a must when I discovered (at 118,000 miles) that the start-up rattle was there all the time at 2,000rpm. This work was carried out in December 2009 and I avoided removing the camcovers or the head. Do use a good 6-point socket set - some of these bolts are VERY tight and a 12-point socket WILL round off the heads
Removing the Timing Cover? or - This is Fun?
Rattling noises from inside the timing cover at 1,500 to 2,000 rpm? - then read on and be prepared for the worst. My photos below may help? You MIGHT get away with just replacing the top chain tensioner which can be replaced without excessive dismantling.
Firstly, Jaguars were not designed to be easy to repair? discover why the apparently simple task of checking the timing chains is far from simple. Do use 6 point sockets to start the 10mm bolts - the bolts are often in so tight the standard 12 point sockets started to slip on the heads.
The preliminaries
First problem is to get the timing chain cover off - what follows assumes that the front of the car is securely supported on ramps.
The work area must be cleared of the undertray, belts, alternator (pivot out of the way), compressor (move out of the way), compressor support bracket, water pump, crankshaft position sensor and radiator fans. There is no need to remove the radiator, drain the sump or disconnect the air conditioning.
The fan pulley can be difficult to remove until you know the trick: you will need a substantial (¾" drive) 15/16" AF or 33mm socket, a substantial breaker bar and length of strong pipe to fit over the breaker bar.
Loosen the crankshaft bolt using a pipe over the breaker bar, placed against the floor. The pipe allows infinite adjustment to ensure all is tight and you have a good angle on the bolt and nothing else in the way. Remove the fuel pump fuse (in the boot fuse box) to ensure the engine won't try to start. Then give the starter one "bump" and the bolt should come free. Crude but effective.
To get the crankshaft damper off I used two levers against the sump casting - naughty but its held in place by a woodruff key so slides off (fairly) easily. If you must use a puller, locate the legs behind the timing wheel, not the pulley, as you could damage the damper.
You will also need to remove the woodruff key from the crankshaft. This can be extremely tight - in theory a sharp chisel under the exposed end and hit with a hammer will pop it off. Do not believe this! I ended up buying a pair of bolt cutters with sharp jaws to bite into the key and even then it really didn't want to come out! As it was severely damaged by the forces necessary, I bought a new one ready for reinstallation.
If just replacing the oil seal and spacer in situ:
Destroy the old seal with a sharp screwdriver and lever it out.
It can be difficult to get the spacer off as there is very little to get hold of. You can't hook behind it because it is flush to the sprocket. Two alternatives - either get it off somehow; or remove the timing cover!!!
It took a bit of patience but a large, good quality water hose clip (Jubilee size 2a) done up very tightly proved a very elegant solution (thanks to Jeff Watson) and avoided swearing, shouting and the sound of multiple hammer blows.
The spacer had settled in so tight the the only way I could get it loose was to screw the hose clip as tight as possible; jam the head of the hose clip bolt against a strong crowbar supported on the ground and use the starter motor trick to loosen it.
That got it turning and after that it just slid off. Beats me why it stuck though. My only thought is that a sliver of sealant might have dropped off onto the crank when I sealed the timing cover in place.
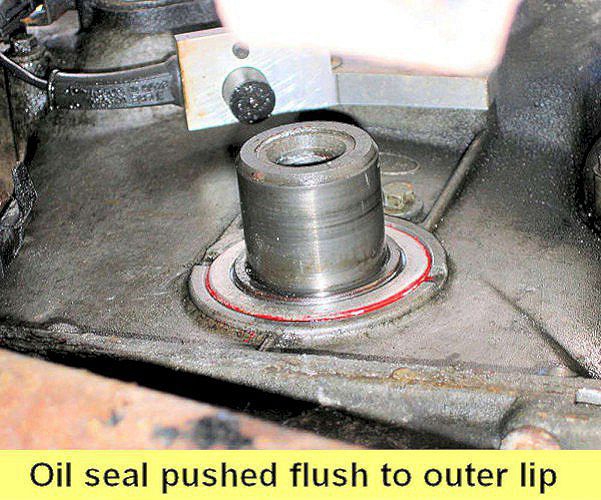
Carefully press the crankshaft oil seal into the timing cover making sure it is flush with the cover and no more - there is a danger of it going too far and dropping into the timing chest. This will lead to gnashing of teeth and the need to take the timing cover off again.
Push the spacer back onto the crankshaft and locate the woodruffe key in its slot. Carefully slide the crank pulley onto the end of the crank. This is a heavy item so be careful should it slip out of your hands (it will try to) when you are underneath! Fit the crank bolt and tighten - I used more screwlock and hit the end of my breaker bar with a heavy hammer until it would turn no further. It hasn't undone since so must be tight enough.
OTHERWISE - Continue to remove the timing cover as below:
To remove the timing cover (big breath)
Just so you have some idea of the scale of the work before you start: you will need to have the car up on ramps in order to work on the timing cover from above and below.
Look at the timing cover - it is quite deep which means that 19 bolts have to be undone with varying degrees of difficulty.
The compressor and its mounting plate have to come off and I took the water pump off to make more space. This is not a two-minute job as you will discover.
- put the car up on your (very strong) ramps
- remove the undertray (if present on your car; mine was missing)
- remove the electric fan assembly
- remove both belts and move alternator back out of the way.
- start the engine briefly (no water circulation) and check the noise is still present (if you are very lucky, the noise may have come from the belts, water pump, compressor or alternator)
- rotate the engine by the crank bolt (33mm socket) to TDC on #1
- loosen the crank bolt: recommended way is to fit 33mm socket onto the bolt head, put a length of pipe over the extension bar onto the ground and then touch the starter. Crude but worked for me and for many others!
- remove the bolt and pull off the crankshaft damper and timing wheel: this is a unit keyed to the crankshaft by a woodruff key. Mine responded to leverage as I couldn't get a puller in the space.
- disconnect the battery (be aware that radio and clock settings will be lost and possibly some of the information stored in the many on-board computers.
- remove the thing in the hole where the distributor used to go and then the upper timing chain tensioner.
- decide now that the compressor will have to be disconnected and moved back out of the way. This is difficult? start by removing the 4 long angled bolts from underneath to remove the compressor from the mounting plate. Then the eight (yes, eight) bolts holding the mounting plate to the engine and remove the mounting plate.
- remove the top hose for better access: I also removed the thermostat housing to replace the thermostat.
NOW CONTINUE AS BELOW:

remove the camshaft position sensor (this is the circular unit in the place you would expect to have found the distributor) by removing the adjusting bolt and lifting the sensor out of housing. As it is driven by skew gears the sensor will rotate as you pull it out - ensure when you replace it that the dimple appears in the centre of the window when the engine is at top dead centre. Put rag in hole to avoid any possibility of anything dropping into the housing which would seriously upset your day.
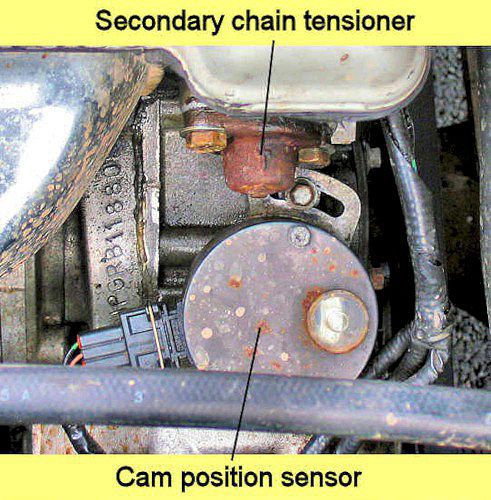
Remove the secondary chain tensioner held by two bolts (note wrong bolts in picture - they should be flanged head bolts M8 x 25mm - and are now!). It should have an arrow pointing upwards, and can only be removed after the camshaft position sensor has been removed - remove carefully as the piston will be expanded on the end!
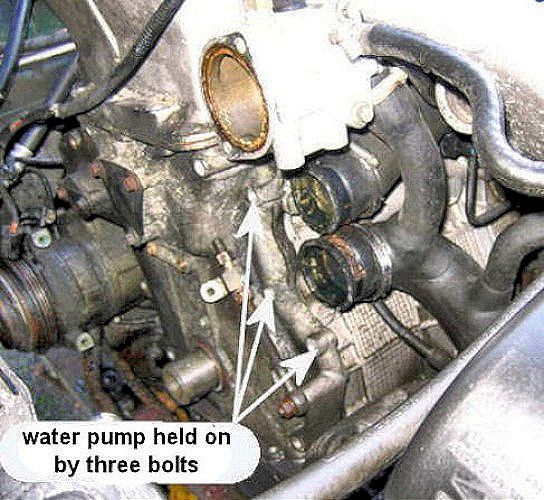
Remove the water pump - this is held on by three 13mm bolts with washers (note these also go through the timing cover so the pump MUST come off!). Make certain you only undo these (looks easy but isn't) as the other bolts with 10mm heads hold the two parts of the pump together. Disconnect the two large diameter water hoses and remove the pump and top hose to a place of safety.
The preliminaries completed, you can now start removing the timing cover which is held on by a total of 19 bolts - see drawing - note that three of these holding the water pump in place are already removed.
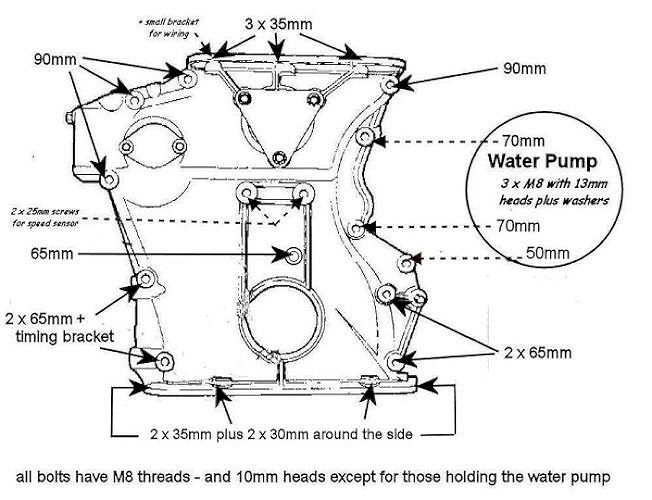
Using a 6-point socket, undo all the 10mm headed bolts that hold the timing cover in place - 11 bolts on the front face; 4 on the sump; 3 on the head. DO note the length of each bolt as it comes off as they are several different lengths. Don't forget the single central bolt between the triangular plate and the crankshaft (ask me how I know this).
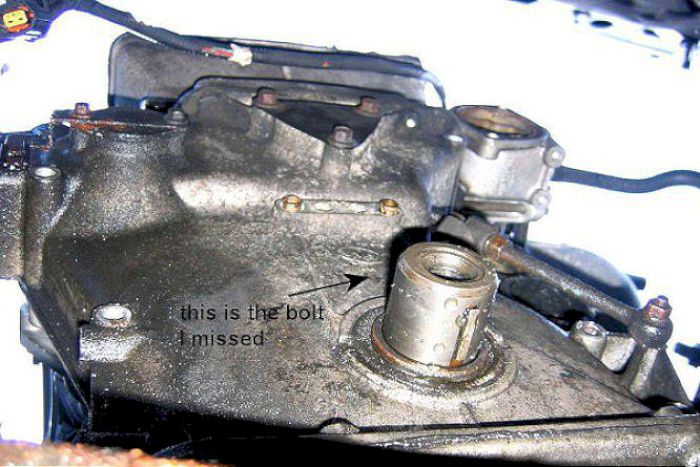
If you haven't got 19 bolts in your container then you've missed some! Also slacken off the next bolts on the sump to release some pressure.
The triangular plate on the top-centre of the timing cover, held in place by 3 bolts does NOT have to be removed.
Recheck that ALL bolts and components have been cleared out of the way. I also loosened the next bolts back on the sump.

Carefully prise the timing cover off, a little bit at a time, be patient!

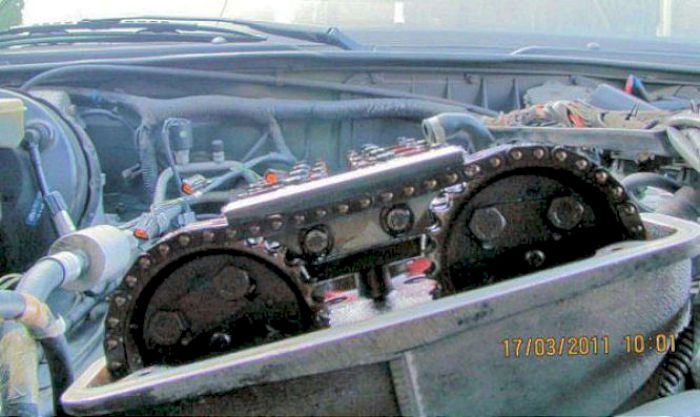
Once moving, prise off equally both sides - in practice, mine slid off easily enough. Now you can get to the timing chains and slippers. This is what you will see under the cover.

the drawing shows the layout of the chains and guides.
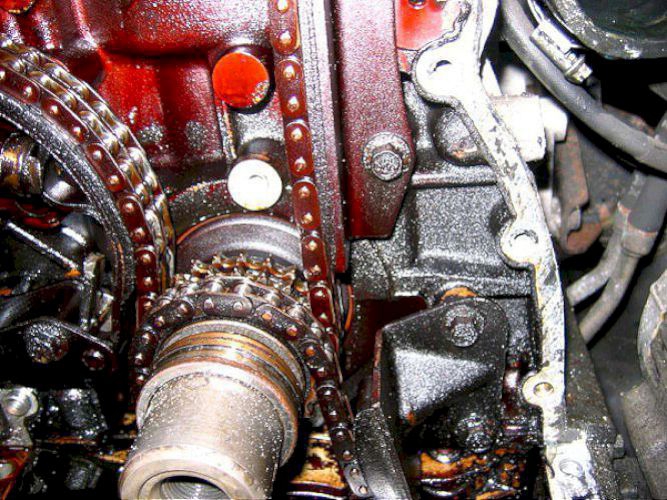
picture of crankshafts and lower timing chains
With the timing cover and woodruff key removed, the crankshaft spacer can be removed. There was a considerable wear ridge from the oil seal but as a new spacer was £33 - I reused it.
BIG MISTAKE as it failed big-time after 2,000 miles and I lost 5 litres of oil in a week. Amazing good luck - the road and pavement were re-tarmacked the following week - but don't rely on this!
Careful with the oil seal, especially the lip which bears on the spacer, new seals come with a plastic guard to help avoid nicking the lip as it is assembled.
Dismantle and clean the secondary chain tensioner - or fit new as I eventually did.
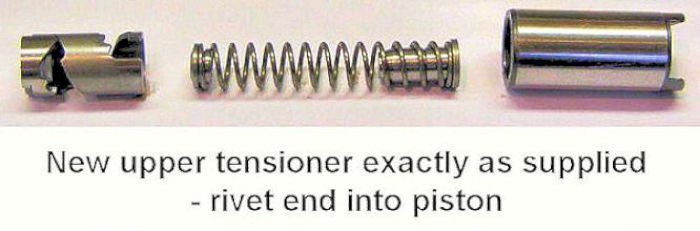
Careful to get the two end-pieces on the spring the right way round! The "rivet" end goes into the piston - the hole on the end is to prevent air locks (not to lubricate the piston/tensioner contact as might be expected).

Prepare for reinstallation by compressing the parts together against the spring until it clicks into the closed position - an allen key to turn it can be helpful. The gasket is not supplied with the tensioner - order EAC4557

This shows the layout of the secondary chain and guides after removing the secondary chain tensioner.
Top left is the pivotted guide which maintains the tension on the chain when the chain tensioner is in place. The damper on the tension (right) side of the chain is straight and fixed.
The chain is slack and has dropped in the picture, take care NOT TO TURN THE ENGINE in case it jumps a sprocket.
If you have got this far you don't need me to tell you how to complete the job of replacing all the chain guides, carefully and methodically - below are the guides as I found them on my engine
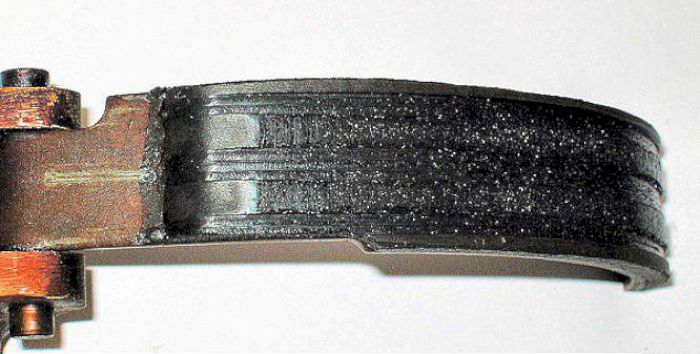
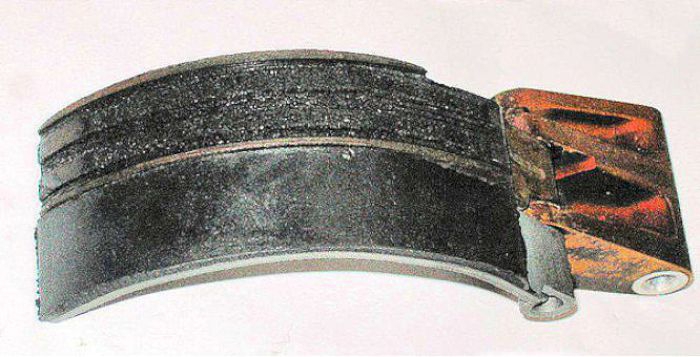
The secondary chain tensioner was well-worn

Looked at end-on you can clearly see the amount of wear on this tensioner.
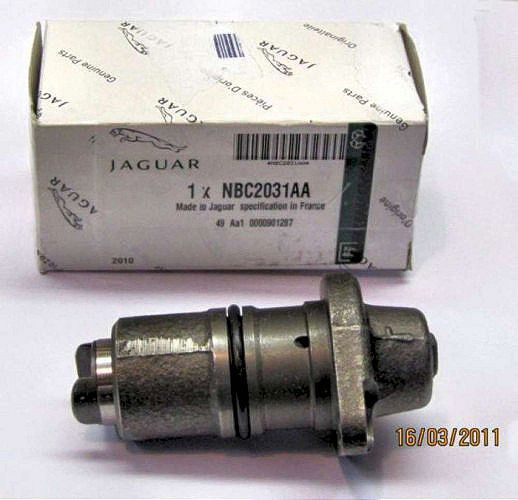
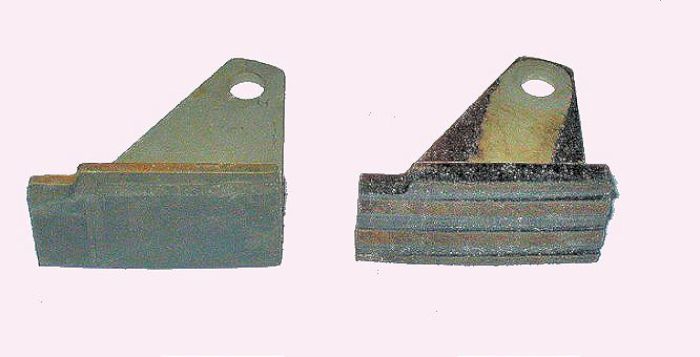
The new tensioner looked much better!
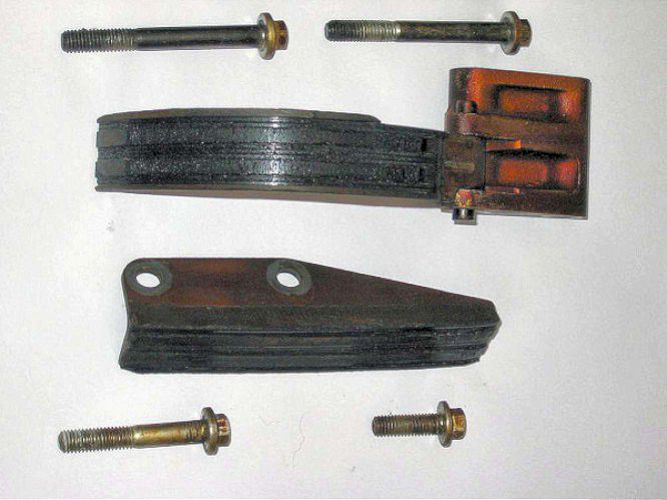
this shows both secondary guides.
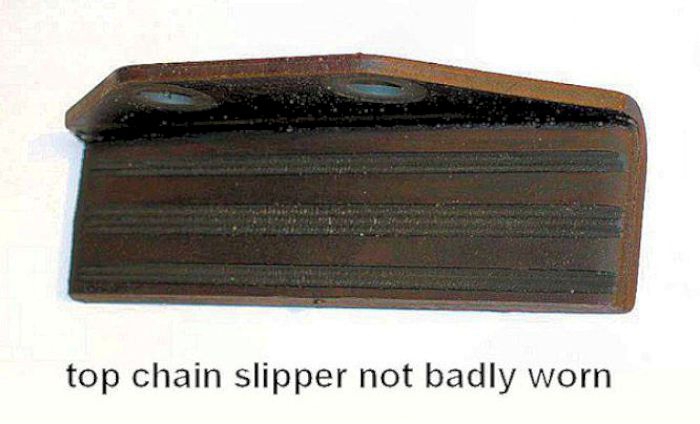
the small top primary guide is held on the same bolts as the secondary tensioner.
it wasn't so badly worn but was replaced anyway.

but the lower primary chain tensioner was the real culprit as it had broken and bent . . . . . .
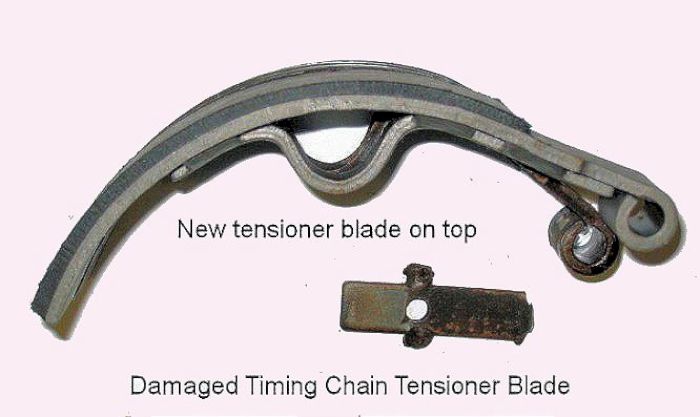
obviously this was replaced by new!
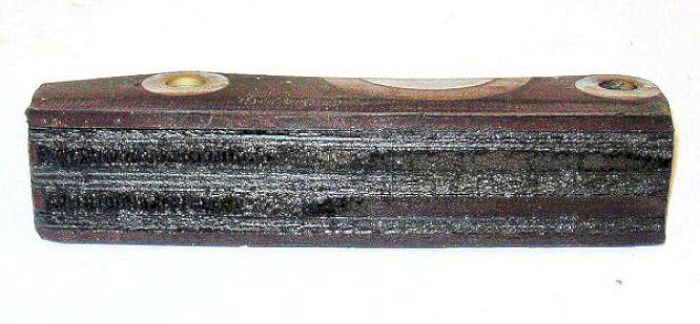
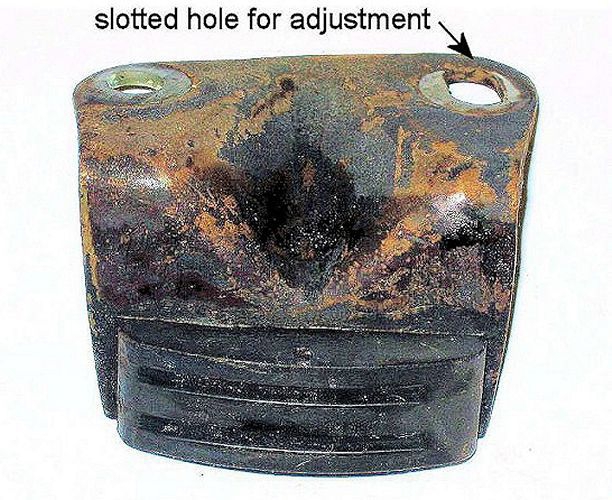
this is the lower (primary chain) damper - impressive grooves

this is the lower (primary chain) tensioner assembly - the "rivet" end of the spring goes into the piston.
even the oil pump chain damper was worn - and replaced
Clean and reassemble all components (use Loctite when replacing all the guide bolt threads).
Carefully slide the timing cover back into place. I used Pro Seal Clear RTV Silicone Adhesive & Sealant on all the edges which adheres well to cleaned metal surfaces. Be careful of the head gasket and the sump gasket when sliding the cover back on - I had no problems at all after blunting the corners with a very light chamfer (the adhesive fills the small void created)
Carefully press the crankshaft oil seal into the timing cover making sure it is flush with the cover and no more - there is a danger of it going too far and dropping into the timing chest. This will lead to gnashing of teeth and the need to take the timing cover off again.
Push the spacer back onto the crankshaft and locate the woodruffe key in its slot. Carefully slide the crank pulley onto the end of the crank. This is a heavy item so be careful should it slip out of your hands (it will try to) when you are underneath! Fit the crank bolt and tighten - I used more screwlock and hit the end of my breaker bar with a heavy hammer until it would turn no further. It hasn't undone since so must be tight enough.
Reassemble all the other bits left over and - finally - enjoy the purr of the big cat!
I subsequently replaced the secondary timing chain damper after removing the cam cover.
When replacing the cam cover, ALWAYS use new seals (13 for the bolts; 6 for the plug wells and the perimeter seal. No sealant should be used. The seals want to spring off, but if thoroughly cleaned, they will stay in place without any sealant.
The perimeter seal comes with the semi-circular pieces already cast in these days, which helps.