Alternator
BE AWARE THAT ALTERNATORS CAN FAIL
WITHOUT A WARNING LAMP SHOWING
please don't
ask how I know this
Peugeot alternator part numbers suggest that all petrols (1.4 and 1.6) use EITHER a 70amp (5705 6C) or 80amp (5705 AW) alternator. Diesels appear to have 150 amp versions (5705 A5)
Basic battery check

Although I have sophisticated test gear, I use a car cigar 12v battery voltmeter for a quick check. This simple meter should indicate around 12.3 volts with ignition on but engine off - rising to around 14.3 volts with the engine running.
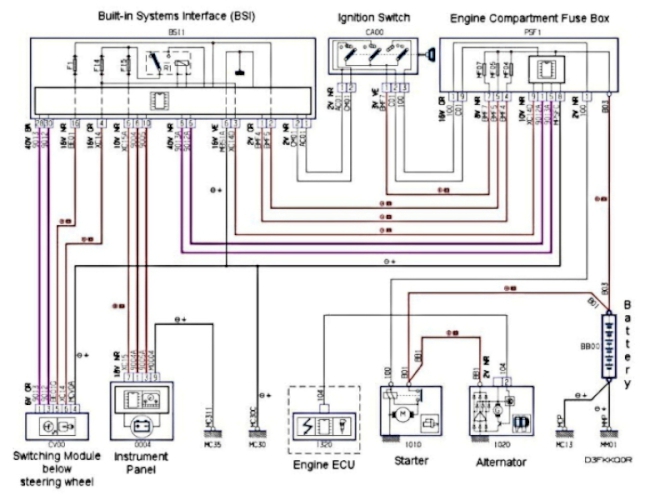
This is the wiring schematic for the starter/alternator/battery
The battery condition is critical (I recommend change every five years) but an increasing number are reporting Alternator problems. The alternator is also connected to the Engine ECU which controls the output voltage.
This is known as "SMART CHARGING" and replacement batteries should be of the Silver Calcium type.
Basic
"How Battery Charging Works"
Basic
"Smart Charging System"
Layman's
"How Battery Charging Works"
Engine dies or gearbox is erratic
The alternator is controlled by the main computer and is not an independent device as in the past. When the alternator stops working the battery volts start to drop and the systems interface will start cutting out the high demanding systems - like air conditioning - until it stops operating the electrical throttle body and finally cuts out the engine. If the voltage drops below 12.4 volts you will have problems including the 2-Tronic shifting.
Faulty alternators can also cause the battery to discharge overnight (see below)
Normally there will be a small discharge of 20-30mA - just enough to keep the essential circuits working. A faulty diode can cause a discharge of up to 500mA - ten times as much and can quickly deplete a battery.
On all three of my 1007's (2 x 1.4 Dolce and 1.6 Sport) I found that initially there was a discharge of 1.6 amps after switching everything off - this dropped to 20-30mA after a minute or so - enough to drive the essential circuits. The battery should last for several weeks without use at this discharge rate.
Changing the alternator
The alternator is a tight fit so some patience may be needed! Some remove the front wheel and mudwing which gives easier access to the end bolts, however most will do it this way:
note that "left" and "right" below relate to standing in front of the car looking towards the engine. Also that the bolts are 16mm so make sure you have the right spanner sizes.
First - Disconnect the battery
the reason for this is that the main lead on the alternator is connected directly to the battery — careful!
- remove the main lead (13mm socket)
- remove the smart exciter plug (this appears to be type PL12-WL which is a two—way version with only one connection being used like this ). To remove: hand down in front of alternator; feel for lever on plug with finger. Pull release lever OUT gently and pull plug gently — easy after the first time!

Turn the bolt at the centre of the tensioner pulley with a spanner to release the belt tension and remove the belt from the alternator pulley
Remove both left-hand fixing bolts (16mm)
Dismount the expansion tank which will allow the flexible pipes to move and create more space to extract/replace the alternator.
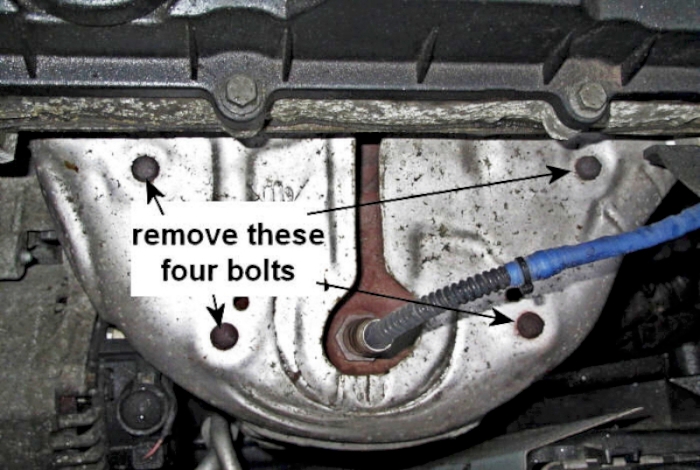
Undo the 4 bolts holding the heat shield over the exhaust manifold and remove it. This improves access to the top right-hand alternator bolt
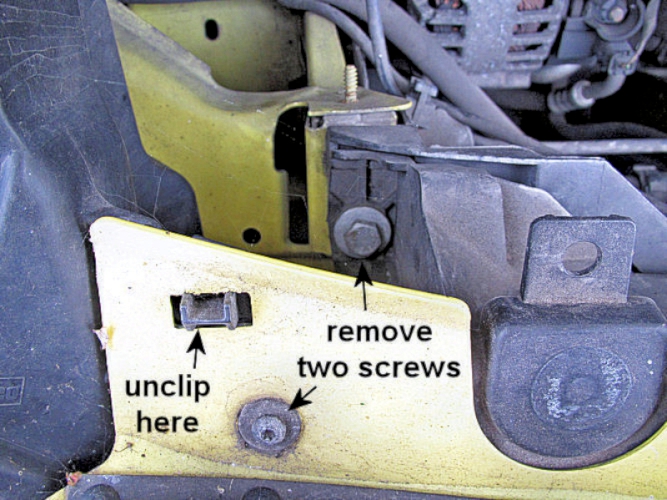
At this stage it may be worth moving the front panel forward slightly to aid removal of the alternator
1. Hook & screw: remove screw and lift panel to disengage from hook.
2. Remove this bolt.
It should now be possible to pull the left-hand side of the radiator assembly forward to make just that little extra clearance that turns a difficult job into an easy one.
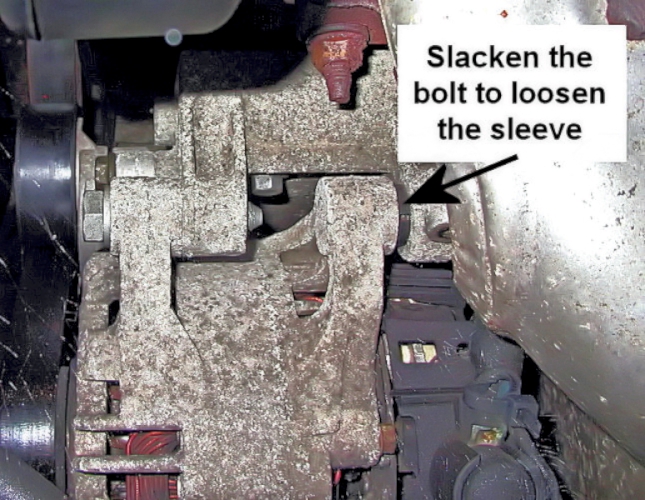
Slacken the alternator upper right-hand mounting bolt (16mm) using a socket on an extension bar inserted under the exhaust manifold from the right-hand side. Slacken sufficiently to reduce the grip of the expanding collar on the mounting.
Loosen the lower right-hand
alternator bolt from under the car. Feel the
head of the bolt and then put the 16mm socket over
the head of the bolt and then clip the socket
spanner in place to turn the bolt. Again,
slacken sufficiently to reduce the grip of the
expanding collar on the mounting.
An alternative method of
getting to this bolt after the top bolt has been
removed, is to use a breaker bar in between the
alternator and bracket and lever it downwards to
expose the bottom right bolt, making it possible
to remove from the top.
Slide the alternator leftwards, the expanding bolts just fit between the mounting brackets so permitting the alternator to be disengaged from the brackets.

Completely remove the expanding bolt assemblies
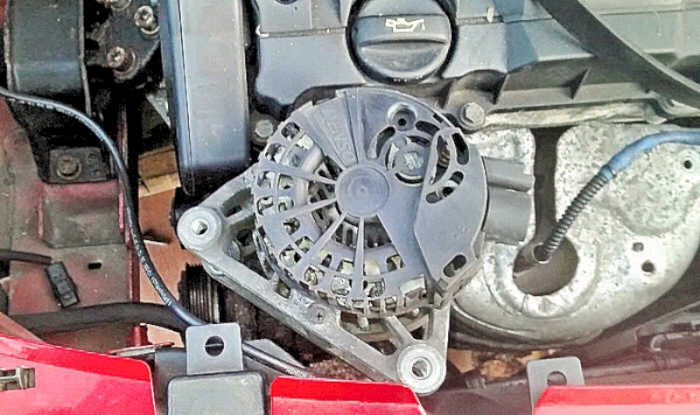
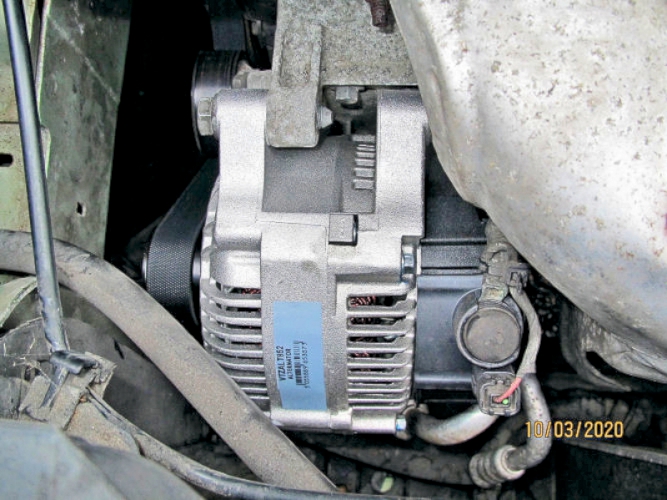
Manipulate the alternator and remove it vertically upwards from the engine bay [see picture for orientation]
Refitting the alternator
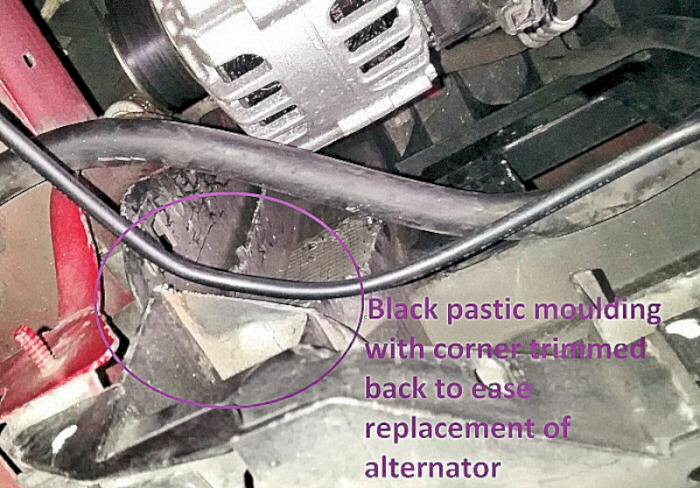
The replacement alternator may be slightly different to the original, so take the precaution of removing the exhaust heat shield and dismounting the coolant expansion tank to enlarge the gap through which the alternator has to be squeezed. It may also be necessary to trim a few mm off the black plastic in the corner of the engine bay [see picture]
After the alternator is squeezed through the gap, reposition the heat shield but leave it loose.
Refit the expanding bolts to the alternator after manipulating into the approximate position in engine bay, but before offering up to the mounting.
Tighten the alternator mounting bolts and refit the belt, holding the tensioner back with a ring spanner.
Bolt the heat shield back into position and refit the expansion tank
Aud Trev Thawley: a WARNING note for anyone attempting the job. The two obvious bolts at the left of the alternator are easy to get at and undo after removing the front drivers wheel and wheel arch trim for easier access.
As for the right-hand ones .......... I thought these were just studs that the alternator located on. However they are actually split sleeves with a tightening bolt that would have made life much easier if I had loosened the bolts first.
Although access to the back is tight, no special tools are needed. It is just a case of loosening the bolts off which then loosens the split sleeve. The alternator slides off and pulls the split sleeve complete with the bolt through the casting.
Sonjia notes that it is possible for the alternator warning light to stay on if the ignition key hasn't sprung fully back to the "run" position after starting. Bit of lubrication on the lock and its been fine since.
also: BE AWARE THAT ALTERNATORS CAN FAIL WITHOUT ANY WARNING LAMP LIGHTING UP
I had a recon alternator fitted - and occasionally heard a faint buzzing noise with everything off. Bought a cheap stethoscope and eventually located the buzz to the replacement alternator.
With the key out, I measured up to 500mA which I put down to a faulty diode. This discharge was enough to lower the battery over a day or so.
Measuring several times, I found the discharge and buzz weren't always present; it seemed to vary with the position of the alternator rotor, though I couldn't replicate it by rotating the rotor by hand. A dreaded intermittent fault.
To circumvent this discharge, I fitted a high-current relay in the alternator line, to come on with the ignition. Problem (sort of) solved.